
Another DIY is in the books! From the moment we moved into our house (4.5 years ago) I knew I wanted to eventually make over our fireplace. My mom really encouraged us to do it when we moved in, but I wanted to wait. In the beginning we were busy putting in new floors throughout the house, painting, buying furniture, etc that I didn't want to put money towards a "big" update like that so quickly. I do things pretty slow so I was OK with waiting. Well, as you know, as the years have gone by, we have made a few updates along the way! We first updated our master bathroom and then added a frame around our buildergrade mirror. What a difference it made! I then felt brave enough to tackle our kitchen. Adam and I talked about it for a while and I did a lot of research and finally just decided to go at it. I am SO happy with our outcome! I was pretty burned out from all that staining so I waited a few months before I tackled Adalyn and Landon's bathroom. It's really amazing what some stain will do to the entire look of a room.
This past Christmas is when it really hit me that I was ready for a fireplace mantle. Pinterest may have encouraged that after seeing how beautiful mantles can be decorated for each season! So, I started my research. I normally will read and read before I jump the gun just so I know exactly what we are getting in to. It was through my research that I learned about AirStone. You can only purchase this product at Lowe's. In our local store they had 3 colors of stone to choose from. (then, online only offered 2 colors) We chose Autumn Mountain for our color and had to purchase flat stones, corner stone, and the natural edge stone. We also had to get 1 tub of the adhesive.

The more reading on this material I did, the more confident I (we) were in tackling this project. We started this during Spring Break (which was wayyy back in March!) We took the kids to their dentist appointment then they tagged along to Lowe's, and then we dropped them off at their grandparents house. Adam and I started on the fireplace around 1:00 and did not finish until about 11:00 that night. We took about a 20 minute break to eat some pizza but then got right back to it. Don't let how long our time took freighten you. I guess it depends on how small or large your project is but overall, it was easy.
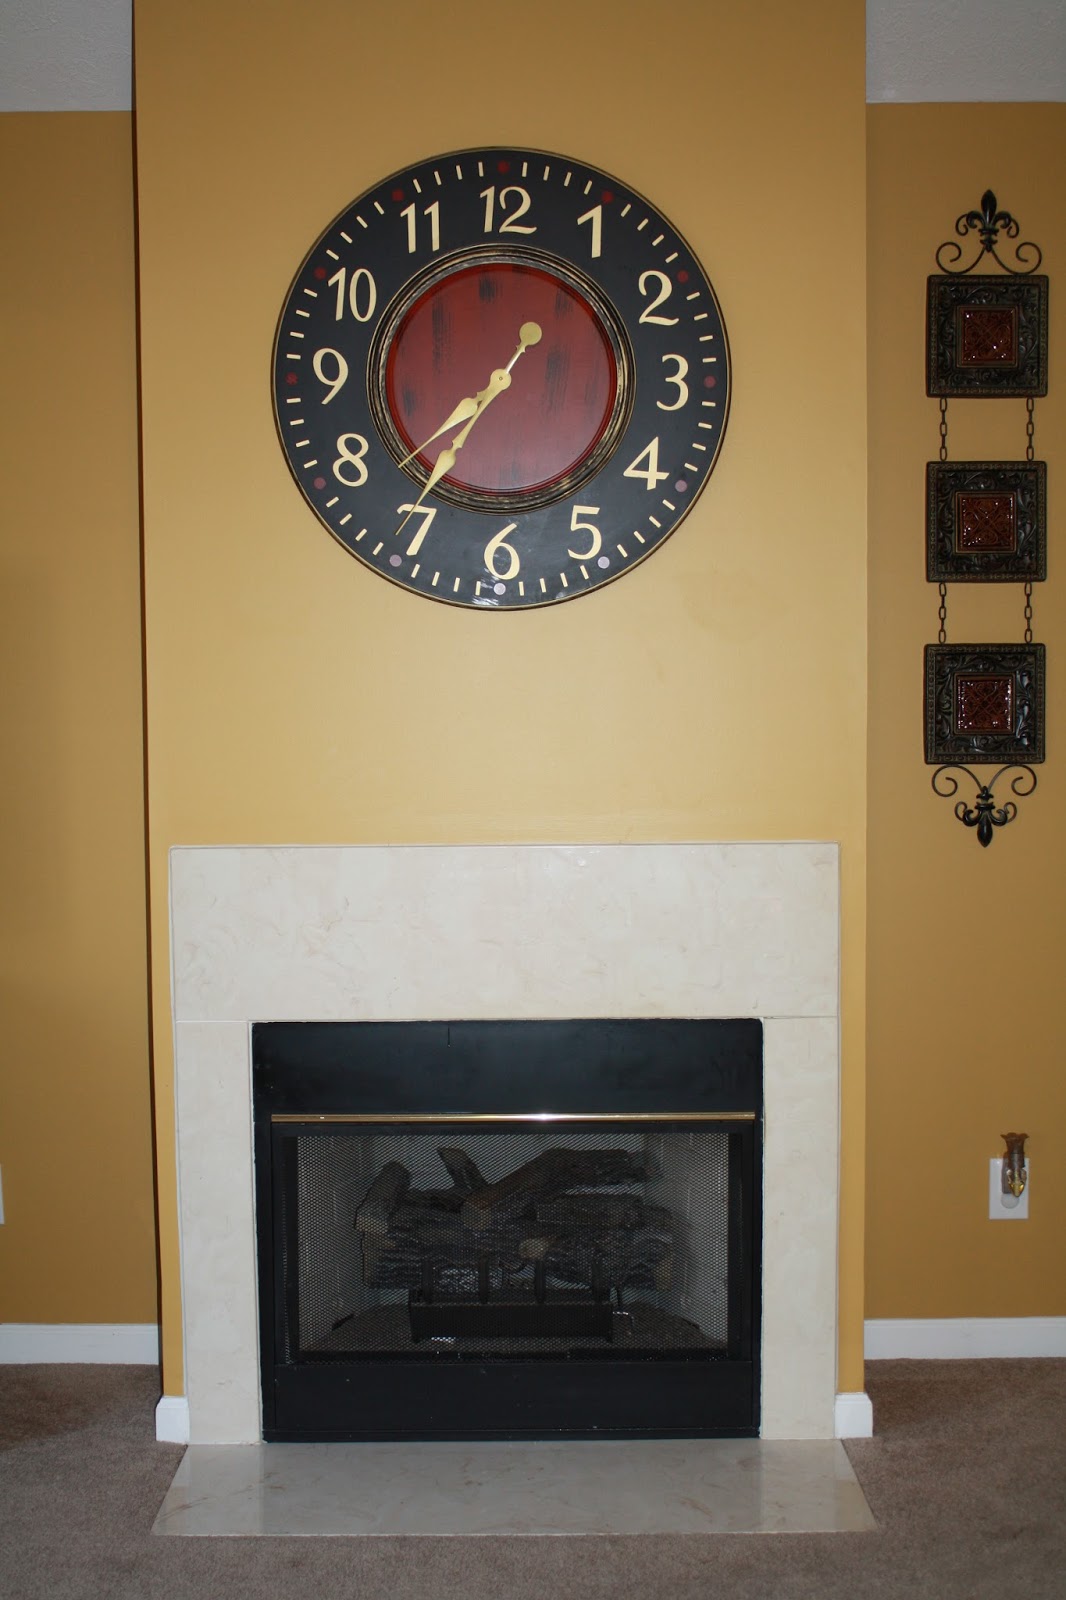
I'm going to start here to show our "before" pictures. I call this a buildergrade fireplace. Nothing fancy whatsoever. It was probably an afterthought of the builder so he did not go above and beyond to make a grand fireplace in this house.


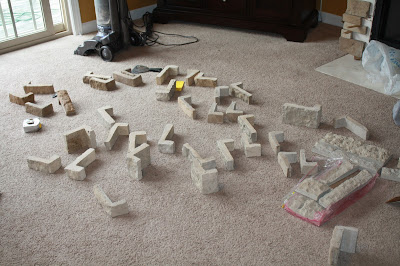
We opened up all the boxes and took some of the stones out to see what we were working with. It can be a little overwhelming because it will become one giant jigsaw puzzle, but if you like figuring stuff like that out, then you will love this project!
When you spread the adhesive on the back of the stone, do so like you would frost a cupcake. It is very simple. Just do not over-do it and have it seep from the side once you put it in place. Also, if it were to get on the front of the stone, wipe it immediately. It will dry and become very difficult to scrape off. Thankfully this didn't happen to us, I just read that suggestion online.


The more reading on this material I did, the more confident I (we) were in tackling this project. We started this during Spring Break (which was wayyy back in March!) We took the kids to their dentist appointment then they tagged along to Lowe's, and then we dropped them off at their grandparents house. Adam and I started on the fireplace around 1:00 and did not finish until about 11:00 that night. We took about a 20 minute break to eat some pizza but then got right back to it. Don't let how long our time took freighten you. I guess it depends on how small or large your project is but overall, it was easy.
I'm going to start here to show our "before" pictures. I call this a buildergrade fireplace. Nothing fancy whatsoever. It was probably an afterthought of the builder so he did not go above and beyond to make a grand fireplace in this house.

Ignore the finger prints on the TV! That is courtsey of Adalyn and Landon
:)


You can see how our fireplace butts out from the wall. We decided to wrap the stone on both sides instead of only stoning the front.
See what I mean? So plain. And kind of sad looking. A girl needs a mantle to decorate for Christmas, right?! Right. My thoughts exactly. To hang our stockings in previous years, I used a push pin right above the porcelin slab. It worked, but I really wanted to hang them from a real fireplace mantle!
The first thing we did was pop off the porcelin slabs. One to the left, one on top, and one down the right.


We had a few great helpers, too. :) It was pretty easy to pop off the slabs. They were thin and light. It pulled a little of the sheet rock off but it was going to be covered up anyway. We picked all the glue spots off and considered our first step of this process was completed. We did things in stages- it's not so easy to work when you have a 5 and a 3 year old who need your attention just about all the time lol
Adam did all the measuring to see how many boxes of stone we would need. You can also visit their website and use their calculator to see how much you will need.
The biggest advice I can share is start on your project at the bottom and triple make sure your first line of stones is 100% level. If not, as you work your way up, they will end up being lopsided and that CAN'T happen!We opened up all the boxes and took some of the stones out to see what we were working with. It can be a little overwhelming because it will become one giant jigsaw puzzle, but if you like figuring stuff like that out, then you will love this project!
When you spread the adhesive on the back of the stone, do so like you would frost a cupcake. It is very simple. Just do not over-do it and have it seep from the side once you put it in place. Also, if it were to get on the front of the stone, wipe it immediately. It will dry and become very difficult to scrape off. Thankfully this didn't happen to us, I just read that suggestion online.

We started with corner pieces first and then worked inward.


There is no right or wrong way in choosing the style of your corner. Just pick one up and go with it. You can see tiny cardboard pieces inbetween the stones. We used them as spacers to keep the stones level as they dried. Worked like a charm!
You will have to cut some stones to size. It was amazing how much dust it would create.


No rhyme or reason. Just pick a shape and color and go with it.

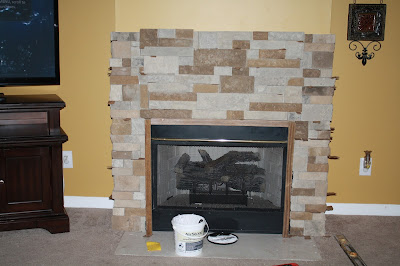
Notice the wood frame? Adam built that real quick to help keep the stones from sliding down before the adhesive set, due to gravity. We kept it up for 24 hours to be on the safe side. Probably not necessary, but we did it just in case.
This was later that night and the front facing was done.


The next moring we finished the sides. We felt like we actually knew what we were doing by that point so it went pretty quickly.


After this process was completed, I then spray painted that ugly brass strip across the front of the facing.

I was a tad nervous that spray paint would travel so I may have went a little over board to cover the stone and floor but I would have been crushed if black paint got on our new stone!
Thankfully, it covered the gold up just fine and didn't "travel" Whew!
I'm being honest when I say once the stones were placed, we took a step back from this project for a while. Why? I really have no earthly idea as to why. I am the type that wants it done quickly as I hate to have things "unfinished" around the house that is totally noticeable. I do know softball season started up and Adalyn had practice twice a week, games once a week, gymnastics one day a week, Church on Wednesday nights, and farming on the weekend. Life is just busy so it went without a mantle for a while.
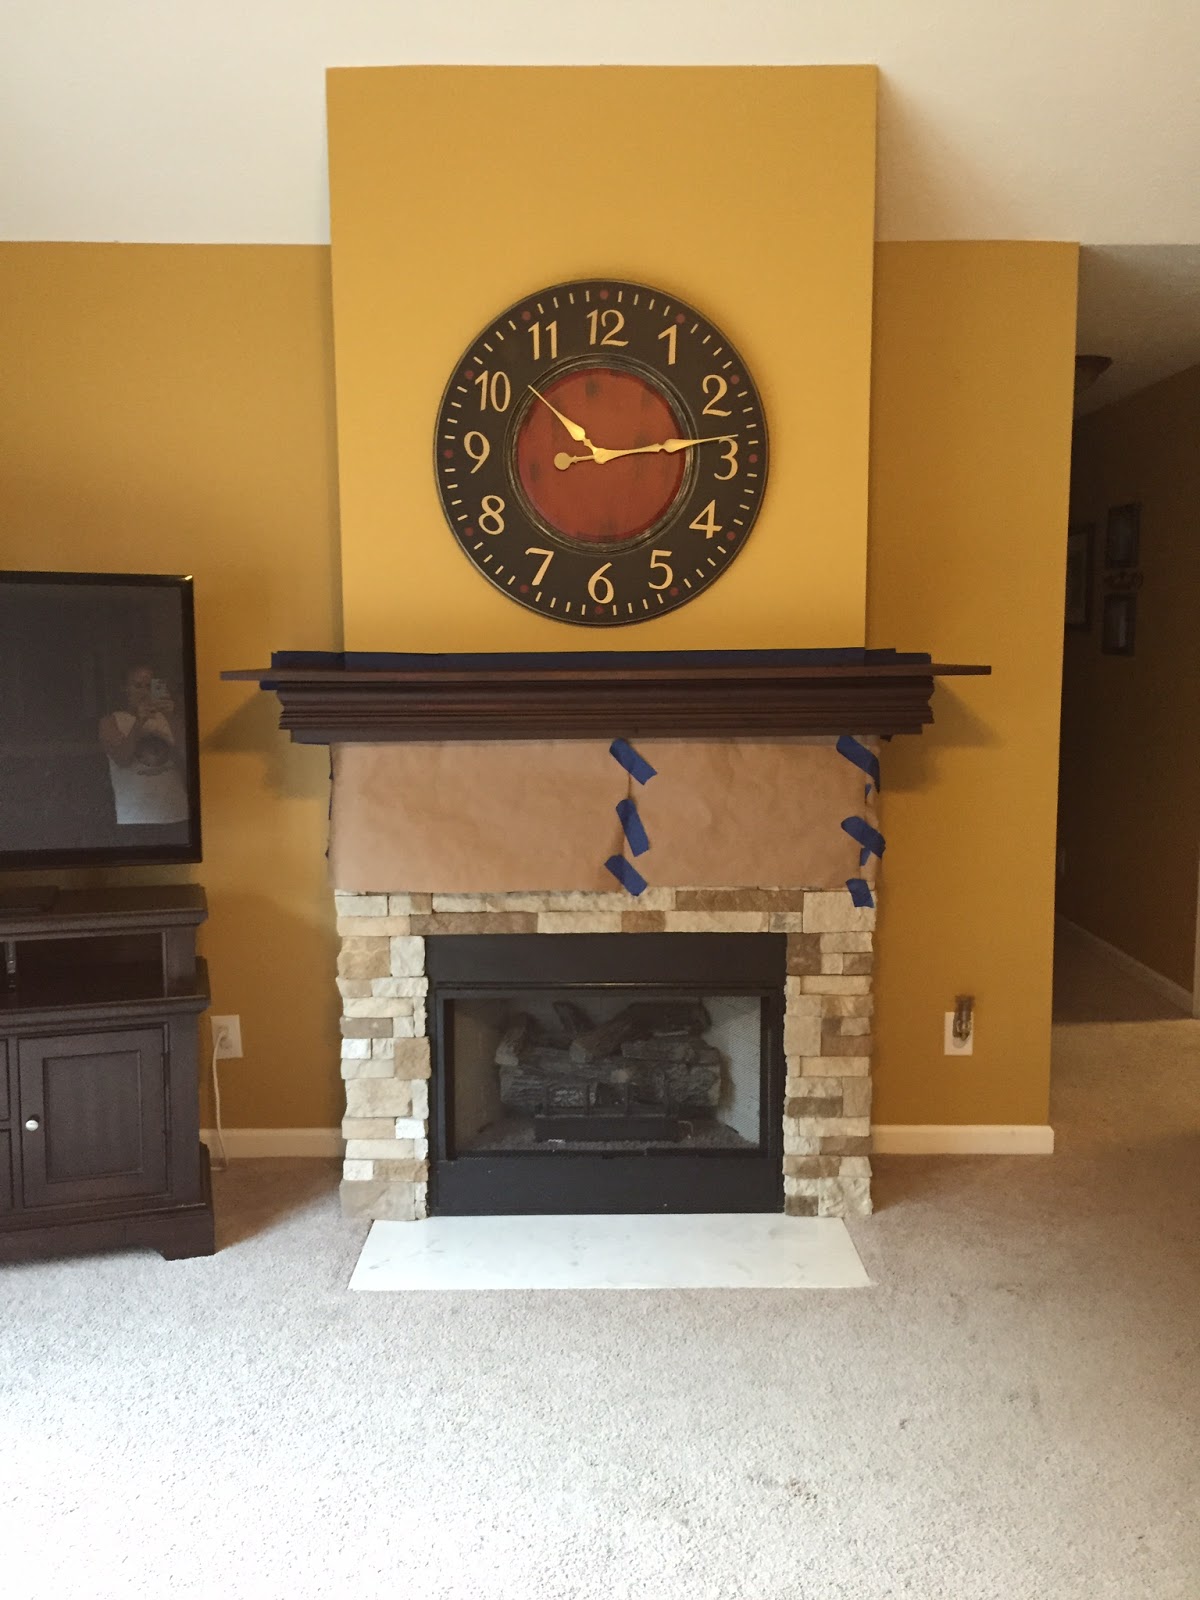
But, the day finally came when Adam had the mantle constructed and attached to the wall!

Now it was all up to me to stain. I used General Finishes Brown Mahogany stain that I had in the garage that was never used. I taped up some brown packaging paper and put a sheet down. I ended up getting one drop of stain on the carpet and after a minor freak out, I googled how to get it out and WD40 took it completely OUT!
Seriously.

After the first coat.
If you remember reading back on my previous posts regarding this gel stain, you know you must let it dry for 24 hours before adding another coat. It took 3 coats and it was completed!
2nd coat

3rd coat
All I had left to do was apply the top coat to bring out the shine and seal the stain.
The top coat dries quickly so I applied it twice within 30 minutes. I also used foam brushes to apply the stain and top coat. I normally purchases the foam brushes from Dollar General but grabbed a bag from Home Depot and I could just tell the difference in the brush.
Here is the final product!


Side by side comparison

You can see I added another candle stick. I took the above pictures when I was
debating on using 2 or 3.
I like it with 3 much better!
What a DIFFERENCE this made in the look of our living room!
So thankful Adam is willing to go along with my DIY ideas and I am so proud of the mantle he built for me! We searched online for tips on how to do it and it turned out exactly like I had hoped.
Keep this in mind if you wish you build your own mantle--- add crown molding to give it detail!
If you have been thinking of using AirStone for a project, go for it! Do your research so you understand how it works. AirStone weighs 75% less than real stone, but you cannot tell the difference just by looking at it. The texture is rough and cool to the touch just like real stone. I am SO happy with our final product- I wouldn't do a thing different! This is a much more affordable way to stone your fireplace, kitchen backsplash, kitchen island, mailbox, etc.
You will not be dissapointed!
Our next project is undermount cabinet lighting then installing a backsplace in the kitchen.
Can't wait!


